Note
In the default configuration, this section of the personal dashboard is available only to users in the Administrative and Technical groups. Editing the settings is available only to users in the Technical group.
In the section Bot protection → Locations
of the personal dashboard Qrator Labs, you can enable, disable and change the processing rules applied to requests on the current domain or service.
Each rule consists of a condition according to which a request is checked, and an action that is performed if the condition is met. No more than one rule applies to a single request.
When a user request arrives at the Qrator Labs server, the server matches it to the rules in the order in which they are stored in the personal dashboard, starting from the top. Upon the first successful match, the action specified in the corresponding rule is performed. If the matches for all the rules fail, then an implicit default rule is applied with the action Do Nothing.
Enable bot protection
-
Select the desired domain in the Domains section or the service in the Services section.
-
Select the menu item Bot protection → Locations.
-
Tick off the option Enabled.
-
To save the changes, click Save in the notification at the bottom of the screen.
The changes will be applied within 5–7 minutes.
Warning
For the bot protection to work, it is required that the Enabled options are activated both in this section and in the section Bot protection → Visitors. For more information about the necessary and recommended steps see Connection: Bot Protection.
Disable bot protection
-
Select the desired domain in the Domains section or the service in the Services section.
-
Select the menu item Bot protection → Locations.
-
Disable the Enabled option.
-
To save the changes, click Save in the notification at the bottom of the screen.
Bot protection will be disabled within 5–7 minutes.
Add a host group
If your domain or service uses a large number of hosts, it may be convenient to combine some of them into host groups. Request processing rules can refer to groups of hosts instead of individual hosts, which simplifies the structure of the rules as a whole.
One host can be a member of several groups at the same time.
Example
Let's assume that part of your site's content is located on subdomains that indicate the language used: ru.example.com, en.example.com , es.example.com etc. In this case, you can create a host group with the name Language versions of the site
, which includes these subdomains, and refer to it in the rules.
If later on you add a new language and a new subdomain to the site that would be subject to the same rules, just add the subdomain to this group.
To add or change a host group:
-
Select the desired domain in the Domains section or the service in the Services section.
-
Select the menu item Bot protection → Locations.
-
In the Host-groups section, click on the link Add host-group.
-
In the dialog that opens, fill in the fields:
- Name — the unique name of the group.
- Hostnames — the list of hosts in the group, one host per line.
-
Click the button Save.
-
To save the changes, click Save in the notification at the bottom of the screen.
The changes will be applied within 5–7 minutes.
Edit a host group
-
Select the target domain in the Domains section or the service in the Services section.
-
Select the menu item Bot protection → Locations.
-
In the Host-groups section, click the Edit link next to the name of the group you want to change.
-
In the dialog that opens, fill in the fields:
- Name — the unique name of the group.
- Hostnames — the list of hosts in a group, one host per line.
-
Click the button Save.
-
To save the changes, click the button Save in the notification at the bottom of the screen.
The changes will be applied within 5–7 minutes.
Delete a host group
-
Select the desired domain in the Domains section or the service in the Services section.
-
Select the menu item Bot protection → Locations.
-
Make sure that the host group to be deleted is not used in the request processing rules.
If necessary, edit or delete the rules referring to this host group.
-
In the Host-groups section, click the Delete link next to the name of the group you want to change.
-
Confirm the action by clicking Delete in the dialog that appears.
-
To save the changes, click Save in the notification at the bottom of the screen.
The changes will be applied within 5–7 minutes.
Add or change a request processing rule
-
Select the desired domain in the Domains section or the service in the Services section.
-
Select the menu item Bot protection → Locations.
-
Find the rule that you want to change, or the place where you want to add a new rule.
- To change an existing rule, click the icon next to the rule.
- To add a new rule, click the link Add a rule in the correct place. For example, to make the new rule the highest priority, click the link above the first existing rule.
The dialog with the rule settings will open.
-
Enter the name of the rule in the field Name. (This step can be skipped.)
-
In the IF section, describe the condition under which the rule is triggered. The condition consists of three parts that check different components of an HTTP request. The verification method is selected independently for each of the parts.
-
Host — the host to which the request is being made. For example:
example.com.Ways to check the host:
- Host group — the host must belong to a host group selected from the drop-down list.
- Any value — the host can be any value.
- Equal — the host must strictly match the string entered in the text field.
- Starts with — the host must start with the string entered in the text field.
- Ends with — the host must end with the string entered in the text field.
- Contains — the host must contain the string entered in the text field.
-
Method — HTTP request method. For example:
GET.Ways to test the method:
- Any value — the method can be any value.
- Equal — the method must strictly match the method selected from the drop-down list.
-
Path — the path to which the request is made. For example:
/.Ways to check the path:
- Any value — the path can be any value.
- Equal — the path must strictly match the string entered in the text field.
- Starts with — the path must start with the string entered in the text field.
- Ends with — the path must end with a string entered in the text field.
- Contains — the path must contain the string entered in the text field.
When selecting the verification methods Equal, Starts with, Ends with or Contains, an additional popup window appears with the checkbox One of. Check off this checkbox to specify several possible values with which the component from the request will be compared. Leave the checkbox unchecked and press the Esc key to specify only one value.
-
-
In the THEN section, select what should happen when the rule is triggered.
-
Accept & Inject JS Challenge — the user will receive the content of the site only if there is a correct cookie. If the cookie is missing or incorrect, the user will receive a page with a JavaScript verification code. After successful verification, the user will receive a cookie, and the page will be automatically reloaded.
-
Accept With Cookies Only — the user will receive the content of the site only if there is a correct cookie. If the cookie is missing or incorrect, the user will receive a response with the status 403 Forbidden.
-
Do Nothing — the user will receive the content of the site without additional checks.
-
CDN Origin — a special cookie for CDN will be sent to the user. Use this option for locations where static content is cached using third-party CDN services.
Please note that the action Accept and Show Challenge is intended only for processing GET requests and may not work correctly with other types of requests. The rest of the actions work with any kind of requests.
-
-
Click the button Save.
-
To save the changes, click Save in the notification at the bottom of the screen.
The changes will be applied within 5–7 minutes.
Change the order of the rules
-
Select the desired domain in the Domains section or the service in the Services section.
-
Select the menu item Bot protection → Locations.
-
Hold the left mouse button on the icon next to the rule you want to move, and, without releasing the button, drag it to the desired position in the list.
If necessary, repeat this for other rules that need to be moved.
-
To save the changes, click Save in the notification at the bottom of the screen.
The changes will be applied within 5–7 minutes.
Delete a rule
-
Select the desired domain in the Domains section or the service in the Services section.
-
Select the menu item Bot protection → Locations.
-
Next to the rule you want to delete, click the icon .
-
Confirm the action by clicking Delete rule in the dialog that appears.
-
To save the changes, click Save in the notification at the bottom of the screen.
The changes will be applied within 5–7 minutes.
Configuration example
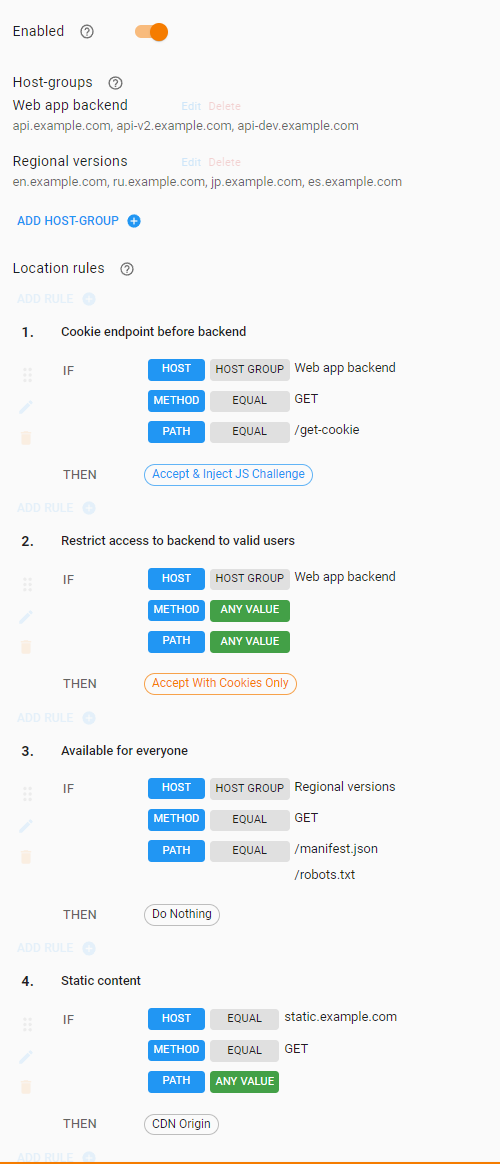
In this example, the client has configured the protection of a single-page web application. The web application runs on hosts from the group Regional versions
, and interacts with the backend that runns on hosts from the group Web application backend
.
The web interface is available to users only if they pass the challenge (rule 2). An exception is made for several files that can be requested by external services and applications (rule 1).
The backend is available only after the browser has been verified for the web interface and has received a tracking cookie (rule 3).
Static content is served with a special cookie for external CDN providers (rule 4).