Note
In the default configuration, this section of the personal dashboard is available only to users in the Administrative and Technical groups. Editing the settings is available only to users in the Technical group.
This page describes the settings available after switching to the CDN mode in the switch on the top left.
For convenience, the default Qrator mode also provides the Qrator.CDN section in a domain's settings, but some settings may be unavailable there.
Change HTTP header settings
This block contains settings related to processing HTTP headers in requests and responses sent and received by the CDN server.
-
In the CDN mode, go to the Domains section and click on a domain.
-
Select the menu item Headers.
-
Change the settings.
-
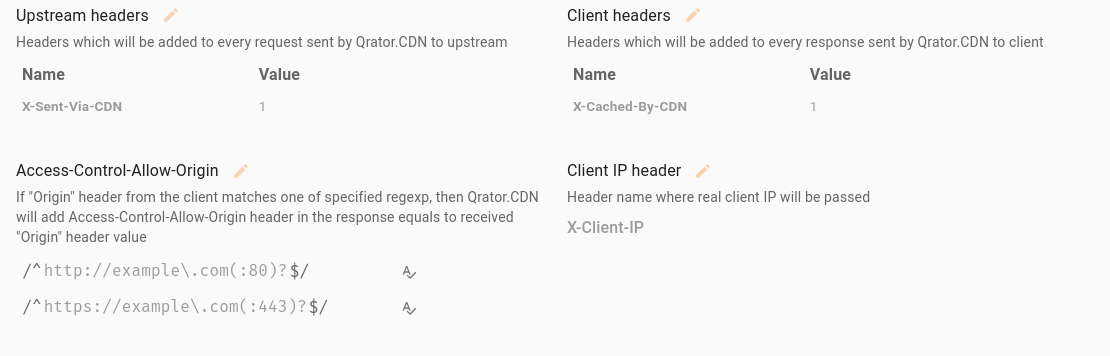
Upstream headers, Client headers
Sets of HTTP headers appended by CDN. Upstream headers defines the headers added to each user request when sending it to the upstream. Client headers defines the headers added to each response returned to the user.
Click the Edit button next to the name of the header set you want to edit. For each header enter Name and Value separately. Both name and value should be non-empty. In order to add another header click Add row. In order to delete a header click Delete. Click Save to apply the changes.
-
Access-Control-Allow-Origin
A list of regular expressions defining the acceptable values of the
Originheader in user requests. For eachOriginvalue matching one of the regular expressions CDN will add the same value in theAccess-Control-Allow-Originheader of the response. Thus the browser will be allowed to use the files received from CDN on websites listed in theOriginheader.Click Edit. Enter a valid regular expression on each line. If the expression is valid you will see a icon next to it. To add another regular expression click Add row. To remove a regular expression click Delete. Click Save to apply the changes.
Tip
You can check the correctness of a regular expression by clicking the icon. In the appearing widget you can input an arbitrary string to check whether it matches the regular expression you put in earlier or not. If the check is successful you will see the icon near the string, otherwise you will see the icon. In order to close the widget and go back to editing the regular expression, click outside it or press Esc key.
-
Client IP header
If you set this parameter, CDN will pass a user's IP address to the upstream in an HTTP header with the given name.
Click Edit. In the appearing text area enter a valid HTTP header name. Click Save to apply the changes.
-
Example
View list of hosts
-
In the CDN mode, go to the Domains section and click on a domain.
-
Select the menu item SNI/Hostnames.
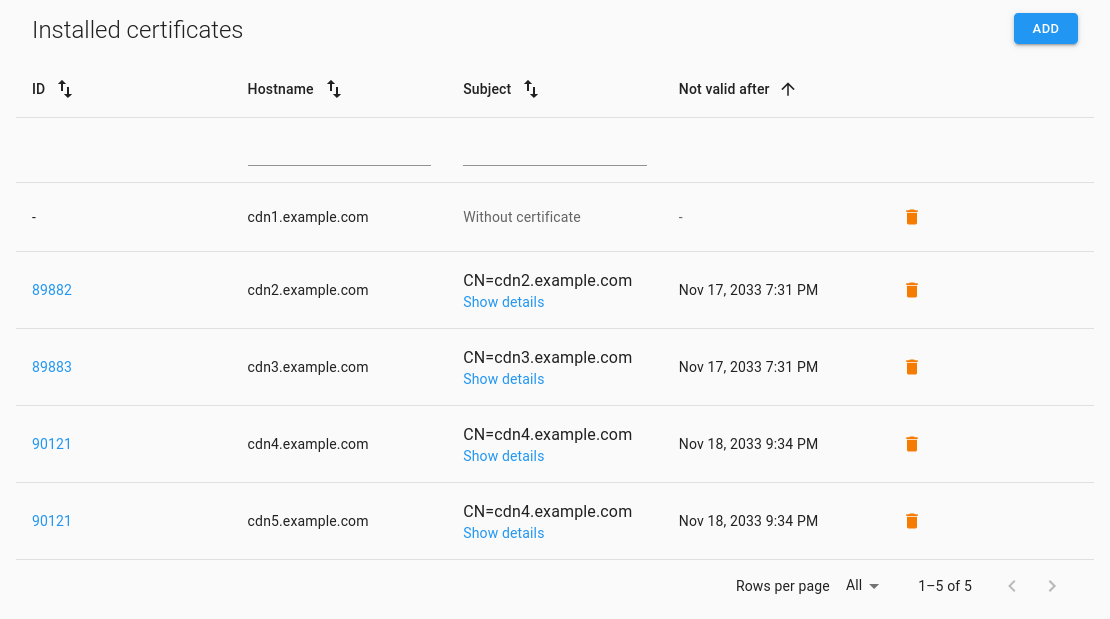
The hosts that you have set up for Qrator.CDN are displayed in a table with the following columns:
- ID (HTTPS only) — unique numeric identifier of the certificate in Qrator Labs. Click on the identifier to see the full certificate details in the Certificate storage.
- Hostname — the hostname at which Qrator.CDN is available.
- Subject (HTTPS only) — the
Subjectfield of the installed certificate. Click Show details in the table cell to see short certificate details. - Not valid after (HTTPS only) — certificate expiration date. If the certificate has already expired, this field will be highlighted in color.
Next to the table column headers are filter fields you can use to quickly find domains with certain values in their Hostname and Subject.
Example
Add an HTTP host
-
In the CDN mode, go to the Domains section and click on a domain.
-
Select the menu item SNI/Hostnames.
-
Click the Add button.
-
In the dialog that appears, click Install next to the item
Without certificate
. -
In the text field that appears, enter one or more hosts at which Qrator.CDN should be available.
-
Click the Install button.
A row will be added to the table for each of the hosts entered.
-
To save the changes, click Save in the notification at the bottom of the screen.
The changes will be applied within a few minutes.
-
Access your domain name registrar's control panel. For each of the hostnames CDN must respond by create a CNAME record pointing at the primary hostname that you were given when registering for Qrator.CDN. You can contact the Qrator Labs technical support to find out your primary hostname.
Wait for the DNS cache refresh after saving the changes if needed.
Add an HTTPS host
-
Make sure that a valid certificate for the host you want to add is present in Certificate storage.
-
In the CDN mode, go to the Domains section and click on a domain.
-
Select the menu item SNI/Hostnames.
-
Click the Add button.
-
In the dialog that appears, find the certificate for the host that you want to add. If necessary, use the Hostname, Subject and Type filters to search for it.
Click Install next to the certificate you need.
-
In the text field that appears, enter or select from the dropdown list one or more hosts for which the certificate should be used.
-
Click the Install button.
A row will be added to the table for each of the hosts entered.
-
To save the changes, click Save in the notification at the bottom of the screen.
The changes will be applied within a few minutes.
-
Access your domain name registrar's control panel. For each of the hostnames CDN must respond by create a CNAME record pointing at the primary hostname that you were given when registering for Qrator.CDN. You can contact the Qrator Labs technical support to find out your primary hostname.
Wait for the DNS cache refresh after saving the changes if needed.
Delete a host
-
In the CDN mode, go to the Domains section and click on a domain.
-
Select the menu item SNI/Hostnames.
-
Find a host and click next to it.
-
To save the changes, click Save in the notification at the bottom of the screen.
The changes will be applied within a few minutes.
Set Request URL policy
By defauld Qrator.CDN assumes every request it receives should be forwarded to the upstream but in some cases this may be a suboptimal behaviour.
If you are aware that on some URLs the upstream cannot provide the content and the user should receive 404 Not Found or any other error code, it is recommended to describe them using the request URL policy. Such configuration allows CDN to return error code responses without requesting the upstream in aforementioned cases.
Note
CDN only analyzes the path component of the requested URL. For example, if a user requests /images/logo.png?v2, the rules of this section will be checked for /images/logo.png.
In order to set the policy:
-
In the CDN mode, go to the Domains section and click on a domain.
-
Select the menu item Request URL policy.
-
Edit the settings.
-
White URLs
A list of regular expressions describing all paths a user may request from CDN. If this parameter is non-empty, for any other URL the 404 Not Found error will be returned (except for Blocked URLs).
Click Edit. Enter a valid regular expression on each line. If the expression is valid you will see a icon next to it. To add another regular expression click Add row. To remove a regular expression click Delete. Click Save to apply the changes.
-
Blocked URLs
A list of reregular expressions describing specific paths for with CDN must return specific error codes.
Click Edit. Enter a valid regular expression on each line. If the expression is valid you will see a icon next to it. In the Code field ender the error code CDN should return for the requests matching this regular expression. To add another tuple of a regular expression and an error code click Add row. To remove a tuple click Delete. Click Save to apply the changes.
Tip
You can check the correctness of a regular expression by clicking the icon. In the appearing widget you can input an arbitrary string to check whether it matches the regular expression you put in earlier or not. If the check is successful you will see the icon near the string, otherwise you will see the icon. In order to close the widget and go back to editing the regular expression, click outside it or press Esc key.
-
Example

Change cache settings
-
In the CDN mode, go to the Domains section and click on a domain.
-
Select the menu item Cache.
-
Edit the settings.
-
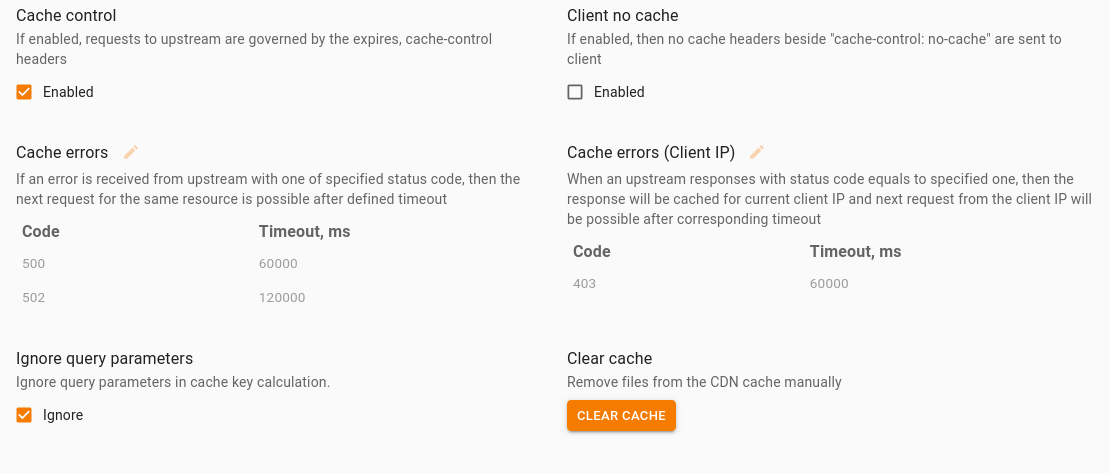
Cache control
Defines whether CDN should respect the time to live of the cached files provided by the upstream in
ExpiresandCache-Controlheaders. -
Client no cache
If enabled, then no cache headers beside
Cache-control: no-cacheare sent to client. -
Cache errors
If an error is received from upstream with one of specified status codes, then the next request for the same resource is possible after defined timeout.
Click Edit. Ented the error Code and the corresponding Timeout to cache it. Timeout value may range from 60 000 to 300 000 ms. Click Save to apply the changes.
-
Cache errors (Client IP)
Identical to Cache errors but the cache saved according to these rules will only be used for requests from the same IP address as in the original request.
-
Ignore query parameters
Ignore all GET parameters when caching. It is convenient when you are using randomly generated GET parameters to force the browser to refresh the cached content, but do not want CDN to make unneeded requests to the upstream server.
-
Clear cache
You can manually remover one or several files from CDN.
Click Clear cache. In the appearing window specify paths to all files you wish to remove from the cache Each path should start with
/. After that click Clear cache once more. The specified files will be removed from the cache in several minutes.
-
Example
Change transport settings
-
In the CDN mode, go to the Domains section and click on a domain.
-
Select the menu item Transport.
-
Edit the settings.
-
HTTP/2 Support
Enable the HTTP/2 protocol support. If disabled, CDN will use only the HTTP/1.1 protocol.
-
Compression algorithms
You can enable or disable the support of certain compression algorithms here. By default Qrator.CDN supports
gzip,deflateandbrformats but you can disable any of them by unticking the checkboxes.
-
Example

Configure conversion of the images to WebP
-
In the CDN mode, go to the Domains section and click on a domain.
-
Select the menu item WebP.
-
Click Turn on to enable or disable the autoconversion to the WebP format.
If necessary, change the value for the Quality parameter. Lower values of the parameter mean higher effectiveness of the compression but bigger losses in the image quality.
-
To save the changes, click Save in the notification at the bottom of the screen.
The changes will be applied within a few minutes.
Example

Configure HTTP redirects
-
In the CDN mode, go to the Domains section and click on a domain.
-
Select the menu item HTTP redirects.
-
Click Turn on to enable or disable the redirects.
If necessary, change the HTTP-Code for redirects. The following codes are available:
- 301 Moved Permanently
- 302 Found
- 307 Temporary Redirect
- 308 Permanent Redirect
-
To save the changes, click Save in the notification at the bottom of the screen.
The changes will be applied within a few minutes.
Example

Turn off Qrator.CDN
-
In the CDN mode, go to the Domains section and click on a domain.
-
Select the menu item Turn Off.
-
Click the Turn off button.
-
In the appearing window click Turn off.