Note
In the default configuration, this section of the personal dashboard is available only to users in the Administrative and Technical groups.
Under CDN
in the Qrator Labs dashboard, you can enable and configure CDN integration for the current domain or service.
Enable integration
If CDN integration is not enabled for a domain or service, then buttons for configuring such integration are available in this section.
The required settings depend on which CDN provider you need to configure integration with.
Enable Qrator.CDN
-
Select the domain in Domains.
-
Select the menu item CDN.
-
Click the link Qrator.CDN. In the dialog box that appears, click Turn on Qrator.CDN.
-
The dialog will list the host (domain name) that Qrator.CDN will allocate for files for your domain or service. This host is the main one and is available regardless of the settings. Additionally, you can connect any number of other hosts.
Enter the hosts in the CDN Hostnames field, separating them with line breaks. Click Next.
Note
You will be able to change the list of CDN hosts later.
-
Go to the control panel of your domain name registrar. For each of the hosts that CDN should respond to, create a CNAME record pointing to the primary CDN host provided by Qrator.CDN. For your convenience, an example CNAME record will be shown in the last step in Qrator.CDN setup dialog.
If necessary, wait for the DNS cache to update after the change has been made.
Enable Ngenix integration
-
Select the domain under Domains or service under Services.
-
Select CDN.
-
Click the Ngenix link. In the dialog box that appears, click Enable Ngenix.
Enable Akamai integration
-
Select the domain under Domains or service under Services.
-
Select CDN.
-
Click the Akamai link. In the dialog box that appears, click Enable Akamai.
-
Specify the parameters required to interact with CDN via G2O. These parameters should be obtained from the Akamai website.
- Data header — the name of the header containing the request data.
- Sign header — the name of the header containing the request signature.
- Password — the key used for signature verification.
- Algo — the cryptographic algorithm used for signing the data.
Click Save.
Note
Click Configure later to skip this step. You will be able to edit G2O settings later.
Enable G2O integration
-
Select the domain under Domains or service under Services.
-
Select CDN.
-
Click the G2O link.
-
Specify the parameters required for interacting with CDN via G2O. These parameters should be obtained from the website of the CDN you are using.
- Data header — the name of the header containing the request data.
- Sign header — the name of the header containing the request signature.
- Password — the key used for signature verification.
- Algo — the cryptographic algorithm used for signing the data.
Click Save.
Enable G-Core integration
-
Select the domain under Domains or service under Services.
-
Select CDN.
-
Click the G-Core link. In the dialog box that appears, click Enable G-Core.
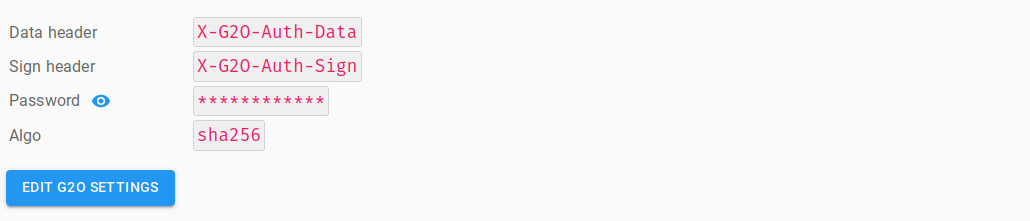
Edit G2O settings
If you use integration with Akamai or with other CDNs running on G2O, you can change the protocol settings in your personal dashboard.
-
Select the domain under Domains or service under Services.
-
Select CDN.
-
Click the link Edit (or Edit G2O settings).
-
In the dialog box that appears, specify the G2O parameters. These parameters should be obtained from the website of the CDN you are using.
- Data header — the name of the header containing the request data.
- Sign header — the name of the header containing the request signature.
- Password — the key used for signature verification.
- Algo — the cryptographic algorithm used for signing the data.
Click Save.
Note
When using Akamai CDN, you can completely disable G2O communication by clicking Reset G2O. However, Akamai IP addresses will remain on the Qrator Labs whitelist.
Configuration example
Disable integration
-
Select the domain under Domains or service under Services.
-
Select CDN → Settings.
-
Click Disable.
-
In the confirmation dialog box that appears, click Disable.