Note
In the default configuration, this section of the personal dashboard is available only to users in the Administrative and Technical groups. Editing the settings is available only to users in the Technical group.
In the Ports and protocols
section of the personal dashboard, you can specify the directions and volume of legitimate traffic that is expected for the IP addresses of the current service.
How it works
The data in this section is entered as a list of entries. Each entry (except IP service → ANY) contains information about one network protocol allowed. Depending on the protocol, the entry may also contain additional settings specifying the port allowed for that protocol and the traffic limit applied to it.
All inbound and outbound traffic that is not described in any entry for any of the services will be considered illegitimate and discarded when passing through Qrator Labs data scrubbing centers. See Connection: BGP for more information about BGP.
The following entry types are available:
-
Application → DNS
Add such an entry if your DNS server, whose traffic you're protecting with Secure DNS from Qrator Labs, is running on the specified port. Inbound traffic to the specified port from secondary or caching DNS servers of Qrator Labs as well as response outbound traffic to the specified port will be considered legitimate. Note that adding this entry does not automatically activate the Secure DNS service. Contact Qrator Labs tech support to configure the service correctly.
Tip
If you're not going to use Qrator Labs Secure DNS, but want the traffic to your DNS server to be treated as legitimate, you can, instead of this entry, just add IP service → TCP or IP service → UDP with the required port (usually 53).
-
Application → HTTP
Add such an entry if there is a web server running HTTP or HTTPS on the specified port. Traffic will be analyzed to detect attacks specific to these protocols as described in HTTP reverse proxy.
For this entry, an additional setting Secure upstream connection is available. If the web server on the specified port works on HTTPS, enable this setting. Otherwise, leave it disabled.
-
IP service → (protocol)
Add an entry specifying the particular protocol from the IP service section to allow inbound and outbound traffic using the selected protocol. The traffic protocol is determined by headers in the IP packets. All protocols described in Assigned Internet Protocol Numbers are available.
The Whitelist-only access checkbox means that Qrator Labs will reset connections from IP addresses not included in the whitelist.
For any protocol other than TCP, an additional setting — Speed limit — is available. The specified limit applies separately to inbound and outbound UDP traffic on the specified port of each IP address of the service. All traffic exceeding the limit will be discarded even if the user IP address is in the whitelist.
For the TCP protocol, the Speed limit setting is unavailable, since by default the filtering system only allows the legitimate TCP connections to upstream.
For IP service → TCP, three modes of processing the inbound traffic are available:
- Any ports — open all ports for both inbound and outbound TCP traffic.
- Specify port — open one specified port for inbound TCP traffic and allow outbound traffic in response to the legitimate inbound TCP connections.
- Restricted — in this mode, the Any ports checkbox in the Outbound traffic section becomes available: it enabled, Qrator Labs will allow only outbound TCP traffic legitimate on all ports (but not inbound traffic).
For IP service → UDP, two modes of processing the inbound traffic are available:
- Any ports — open all ports for both inbound and outbound UDP traffic.
- Specify port — open one specified port for inbound UDP traffic
Additionally for IP service → UDP, the Block amplification attacks settings is available. If it is enabled, Qrator Labs will consider illegitimate all traffic on the ports vulnerable to Amplification DDoS attacks. In particular, this will close the 53 and 123 ports, commonly used for Amplification attacks via the DNS and NTP protocols, respectively. If you expect legitimate traffic on these ports, i.e., your DNS and NTP servers listen to them, we recommend to describe them separately, without disabling the amplification attacks protection for all other UDP traffic.
-
IP service → ANY
Add such an entry to allow a certain amount of inbound and outbound traffic not allowed by other entries. The Speed limit setting is available for this entry; it specifies how much unidentified traffic is considered acceptable. The same limit applies separately to unidentified inbound and outbound traffic.
This entry is always applied last. So, only traffic that has not been described by any other entry falls into this category.
Warning
When describing the traffic that should be allowed for your service, it's very easy to forget about some infrequent type of inbound or outbound requests and thus accidentally block some service functionality. We recommend creating an ANY entry to compensate for such an error.
Most often, it makes sense to create an ANY entry with a small limit, based on the assumption that in reality the volume of traffic not described by other entries will be zero. After that, guided by logs and service statistics, add new entries if necessary, describing traffic not previously provided for.
-
Other options → Fragmented IP packets
Add such an entry to allow delivery of fragmented IP packets. This option may be necessary, for example, for some SIP protocols.
For this entry, the Speed limit setting is available, specifying exactly how many fragmented packets are considered acceptable. The specified limit applies separately to inbound and outbound traffic.
View list of entries
To view a list of entries:
-
In the Services section of the dashboard, select the required service.
-
Select Ports and protocols.
The page will display a list of entries, each describing a specific type of traffic allowed; see How it works.
For each entry, the following is displayed:
-
Direction of allowed traffic:
 — User-initiated traffic is allowed
 - Upstream-initiated traffic is allowed
 - Both types of traffic are allowed
-
Port and protocol of allowed traffic:
- For entries from the Application category, the name of the allowed protocol and port number are displayed.
- For entries from the IP service and Other options categories, the name of the allowed protocol is displayed.
-
Speed limit (only for entries for which this setting is available)
-
Upstream connection type (only for Application → HTTP entries):
- — Unencrypted HTTP traffic is allowed
- — Encrypted HTTPS traffic is allowed
To quickly find entries, use the filter field above the list. You can enter the following details in the filter:
- Protocol name, e.g.
TCP
orDNS
- Open port number, e.g.
80
or53
, or theANY
string - IP number, e.g.
47
for GRE - Traffic direction, e.g.
input
,output
Add entry
To add a new entry describing legitimate traffic, take the following steps:
-
Go to list of ports and protocols.
-
At the top of the page, click Add.
-
In the drop-down lists in the dialog box that appears, select in sequence the category and type of entry you want to add. For more information on types of entries, see How it works.
-
Depending on the selected entry type, additional settings may become available in the dialog box. In this case, set the required values for the settings.
-
Port number
Specify the port number of the upstream on which connection will be initiated. Note that many protocols may use a different port for outbound traffic than the port on which the inbound traffic arrived. In this case, for some protocols, outbound traffic corresponding to legitimate inbound traffic also becomes legitimate. For more details on how different protocols are handled, see How it works.
-
Speed limit.
You must set a speed limit for most types of entries. Select the unit of measure for the limit from the drop-down list: Kbps, Mbps or Gbps (the Gbps option is not available for some protocols). Then set the value by typing it into the text box or moving the slider.
-
Secure upstream connection
This setting is only available for Application → HTTP entries. Enabling this setting means that HTTPS traffic should be allowed, not HTTP.
-
-
Click Save.
-
To save your changes, click Save in the notification at the bottom of the screen.
Change speed limit
For entries that include a speed limit, you can change this limit at any time after creating the entries.
-
Go to list of ports and protocols.
-
Click the speed limit you want to change.
-
In the dialog box that appears, set the desired speed limit.
Select the unit of measure for the limit in the drop-down list: Kbps, Mbps or Gbps (the Gbps option is not available for some protocols). Then set the value by typing it into the text box or moving the slider.
-
Click Save.
-
To save your changes, click the Save button in the notification at the bottom of the screen.
Delete entry
To delete a single entry:
-
Go to list of ports and protocols.
-
Next to the entry you want to delete, click .
-
To save your changes, click Save in the notification at the bottom of the screen.
To delete multiple entries:
-
Go to list of ports and protocols.
-
Mark the entries you want to delete.
-
Click the Delete link above the list.
-
To save your changes, click Save in the notification at the bottom of the screen.
Configuration example
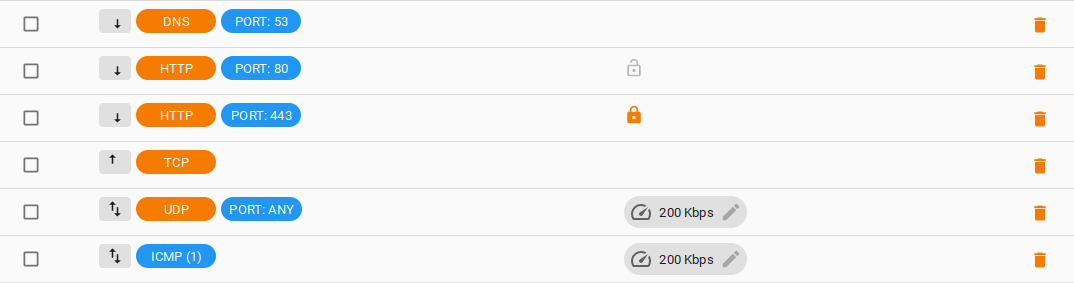
In this example, the client has specified the following ports and protocols:
- Application → DNS на порту 53 для обеспечения работы услуги Защищённый DNS
- Application → HTTP на портах 80 (HTTP) и 443 (HTTPS) для обеспечения работы услуги Обратный HTTP-прокси
- IP service → TCP с запрещённым входящим трафиком и разрешённым исходящим
- IP service → UDP с лимитом скорости 200 Kbps и блокировкой Amplification-атак (не будет распространяться на сервис DNS, описанный выше)
- IP service → ICMP с лимитом скорости 200 Kbps